Printed Toys on Facebook
Printed Toys on Youtube

Cargo ship

stl files to print on your own 3d printer

stl files: 53 , parts to print: 69
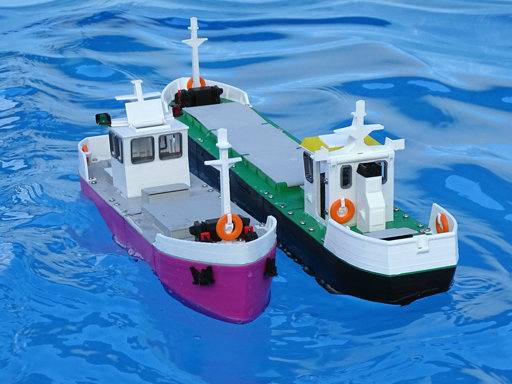
3D-printed Cargo ship

This toy fits popular brick figures and can float on water.
Modular construction, the model can be extended with additional segments.
Ready to print on nano 3D printers
(min. required printing area 80*80*75mm).
Easy to print - no need any supports, brims or rafts.

Set the amount and get
the cargo ship stl files!

You can set the amount you want to pay!

USD Enter the amount above.

Before paying, make sure you have downloaded and tested our free model:
Small fishing boat

After payment is confirmed you will receive an email from Printed Toys with download link.
This link will be active for 7 days from you payment, but you can download the files and store them locally for any length of time.


Cargo ship - Assembly manual

Needed parts or materials (suggested, you can use other matches parts)
  • glue (nedeed to glue 2 stern elements),
  • 2 very short teflon tubes (2 mm inner diameter, 4 mm outer) to seal the propeller shaft and rudder,
  • 8 sets M2.5x6 screw+nut,
  • 55 pieces M2.2x6.5 screw (DIN7981),
  • 1 metal (we recommend brass) rod for propeller shaft (2 mm diameter, 60 mm length),
  • 1 metal (we recommend brass) rod for rudder shaft (2 mm diameter, 90 mm length),
  • several short pieces of filament 1.75 mm for hinges,
  • about 50 cm black chain, link size 2 mm.
Optional parts
  • DC motor (3-6V; MT78),
  • igelit, PCV or rubber tube for connecting electric motor to the shaft,
  • 4*AA battery holder,
  • PCB 7*7 mm switch ON/OFF (mount in wheelhouse cockpit),
  • ship is prepared to mount LED navigation lights (5*LED 5 mm: green, red, 3 white). You also need suitable resistors for each LED.
    See Cargo ship electric diagram (pdf)
Introduction
  • We recommend using PLA filament, nozzle 0.4 mm and layer height 0.2 mm, but you can test other settings.
  • All files are in print-ready positions, you don't have to rotate it on your slicer.
  • Print all elements with 100% filling, except for the lifebuoy.stl and wheelhouse-roof-top.stl (25% filling).
  • You will find all wheelhouse windows in the windows-all.stl file, but you can print each one separately from window-***.stl files.
  • There are two versions of propeller: propeller-real.stl and propeller-easy.stl. The first version has real shape but is difficult to print, the second version is very easy to print but after printing you have to put it in hot water and manually bend the propeller blades.
  • There are two versions of lifebuoy holder: lifebuoy-holder-thin.stl and lifebuoy-holder-bold.stl. Try the lifebuoy-holder-bold.stl version first, if the element is too large and does not fit into the holes, select lifebuoy-holder-thin.stl.
  • Glue the two parts of the stern (hull-stern-A.stl and hull-stern-B.stl) firmly together, check carefully for holes.
  • After placing the propeller and rudder shafts check the hull is not leaking.
    • If the shafts are leaking you can use oil or grease.
    • If the hull leaks you can paint or varnish it.
  • Short ships may need to be trimmed by the stern. Before screwing down the deck you can use some ballast to balance the ship.
  • Use pieces of filament 1.75 mm to attach doors and hatches.

Assembly manual movie

Click to see assembly manual on Youtube.
You can pause the movie and skip frames using "<" and ">" buttons from your keyboard.

License

After purchase files you can:
  • print an unlimited number of models,
  • modify and print modified files,
  • print models for a gift,
  • use printed models for free education.
You can not:
  • use models for earn money,
  • sell printed models,
  • sell any stl files (original or modified),
  • publish or distribute any stl files.